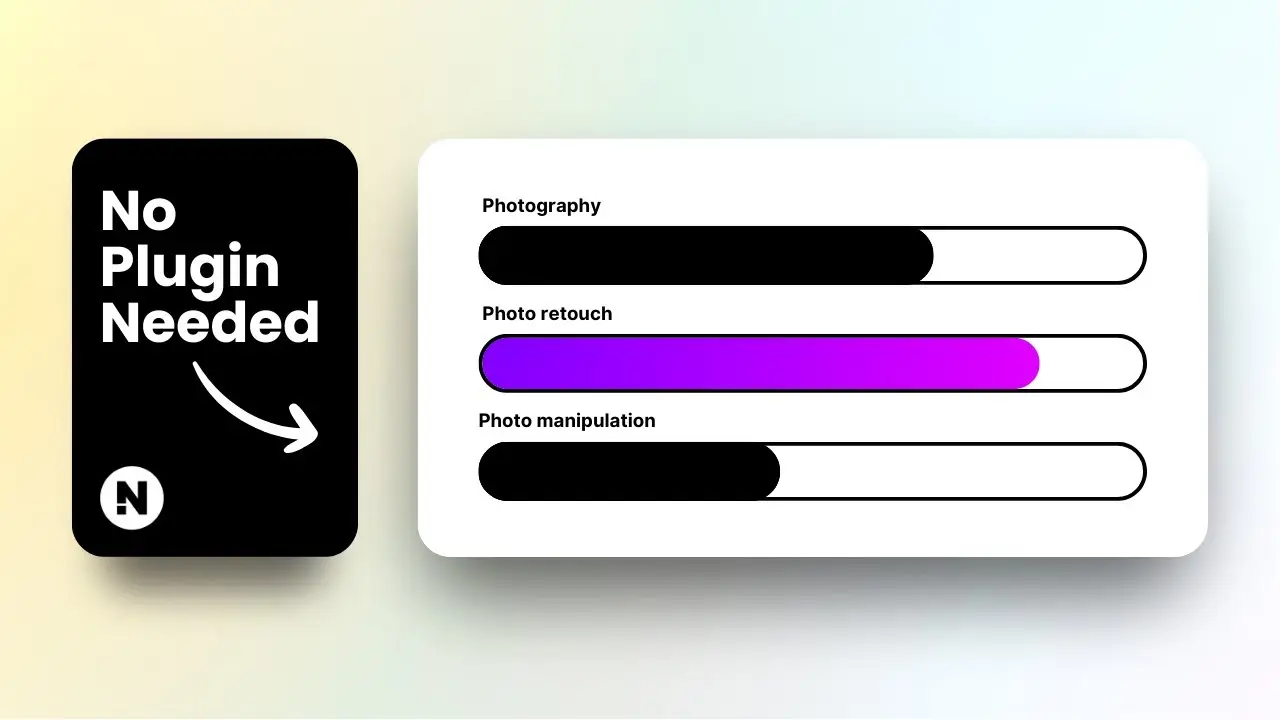
- Learn to build an attractive skill progress bar using only Gutenberg blocks
- Discover a simple technique to customize the progress bar’s appearance and percentage
- Gain insights on making your progress bar responsive for mobile devices
Creating visually appealing elements for your WordPress website doesn’t always require complex plugins or page builders. In this blog post, I’ll show you how to create a stylish skill progress bar using only the built-in Gutenberg blocks. This method is perfect for those who want to keep their site lightweight while still showcasing their skills or project progress effectively.
Let’s dive into the step-by-step process of building this progress bar. I’ll guide you through each stage, from setting up the basic structure to fine-tuning the details. By the end of this tutorial, you’ll have a professional-looking progress bar that you can easily customize to fit your website’s design.
Before we begin, take a look at this video tutorial that demonstrates the process:
Now, let’s break down the process into manageable steps.
Setting Up the Base Structure
The first step in creating our skill progress bar is to set up the base structure using the Group block. Here’s how:
- Open your WordPress editor and create a new post or page.
- Add a new Group block by typing “group” in the block inserter.
- Select the layout that suits your needs.
- (Optional) Disable the “Inner blocks use content width” option if you want the entire block to be wider.
- Go to the Styles tab and change the background color to white (or any color that matches your design).
- Add a black border to the group block and set the border radius to 100px for rounded corners.
This base structure will serve as the container for our progress bar. It’s essential to get this right as it sets the foundation for the rest of the design.
Creating the Progress Bar Columns
Now that we have our base, let’s create the actual progress bar using columns:
- Inside the Group block, add a new Columns block.
- Choose a two-column variation. I recommend the 66/33 split, but you can adjust this later.
- To ensure the progress bar looks good on mobile devices, unstack the columns on mobile view. Do this by selecting the entire Columns block in the document overview and disabling “Stack on mobile.”
- Remove the gap between columns by setting the block spacing to zero for both left and right sides.
These steps create the basic structure of our progress bar, with one column representing the filled portion and the other the empty portion.
Styling the Progress Bar
With our columns in place, it’s time to style the progress bar:
- Add a Group block to the first column (the filled portion of the progress bar).
- In the Styles tab, choose a solid color for the background. Pick a color that stands out against the base color.
- Set the border radius to 100px to match the outer container.
- (Optional) You can make the right side of this column flat by unlinking the border radius and setting the top-right and bottom-right values to 0px.
At this point, you should have a nice-looking progress bar structure. The next step is to make it adjustable.
Adjusting the Progress Percentage
Here’s where the magic happens. You can easily change the percentage of your progress bar by adjusting the column widths:
- Select the first column (the filled portion).
- Go to the Settings tab and find the “Column width” option.
- Change the percentage to your desired value (e.g., 80% for an 80% filled progress bar).
- Adjust the second column’s width accordingly (e.g., 20% for the remaining portion).
This simple technique allows you to create multiple progress bars with different percentages quickly and easily.
Adding Labels and Percentages
To make your progress bar more informative, you might want to add labels and percentage numbers:
- Add a Paragraph block above the progress bar for the skill label.
- Style the text to match your website’s design.
- You can add the percentage number either inside the filled column or next to the progress bar, depending on your preference.
Remember to keep the labels concise and easy to read. How to craft the perfect AI prompt for blog post can help you create compelling labels for your progress bars.
Customizing Colors and Styles
One of the advantages of using Gutenberg blocks is the flexibility in styling. Here are some tips to make your progress bar stand out:
- Experiment with different color combinations for the background, border, and filled portion.
- Try using gradient backgrounds for a more dynamic look.
- Adjust the border thickness and style to match your website’s aesthetic.
- Consider adding subtle animations using CSS if you’re comfortable with coding.
WordPress website design inspiration can provide ideas for color schemes and styles that work well with progress bars.
Making It Responsive
While we’ve already taken steps to make our progress bar mobile-friendly, it’s crucial to test it on various devices:
- Use the WordPress editor’s preview mode to check how your progress bar looks on different screen sizes.
- Adjust the font sizes and padding if necessary to ensure readability on smaller screens.
- Consider using CSS media queries for more precise control over the mobile appearance.
Reusing Your Progress Bar
Once you’ve created a progress bar you’re happy with, you might want to use it multiple times across your site. Here’s how:
- Save your progress bar as a reusable block.
- Give it a memorable name like “Skill Progress Bar.”
- You can now insert this block anywhere on your site and customize it as needed.
How to create reusable blocks in WordPress offers more detailed instructions on working with reusable blocks.
Enhancing Your Progress Bars
To take your progress bars to the next level, consider these advanced techniques:
- Use custom CSS to add hover effects or animations.
- Incorporate icons or small images to represent different skills or categories.
- Create a color-coding system for different types of skills or progress levels.
- Experiment with vertical progress bars for a different layout.
Remember, the key is to keep your progress bars consistent with your overall website design while making them informative and visually appealing.
Conclusion
Creating a skill progress bar in WordPress without plugins is not only possible but also quite simple using Gutenberg blocks. This method gives you full control over the design and functionality while keeping your website lightweight and fast.
By following the steps outlined in this tutorial, you can create professional-looking progress bars that effectively showcase your skills or project progress. Remember to experiment with different styles and layouts to find what works best for your website.
As you become more comfortable with Gutenberg blocks, you’ll discover even more creative ways to enhance your WordPress site without relying on plugins. How to reduce plugins reliance in WordPress can provide additional tips on maximizing the use of built-in WordPress features.
Happy designing, and may your progress bars always be moving forward!


